SHADER Toolkit. Discussions, examples and other cool stuff!

  • #10, by DilatedWednesday, 01. October 2014, 08:35 10 years ago
    Ohhhhh this sounds great, going to try it when I get back to my home set up grin

    Forum Fan

    149 Posts


  • #11, by SimonSWednesday, 01. October 2014, 10:56 10 years ago
    I think I would need write a lot of documentary alone on these parameters of the light. I try to give the short version.

    There are 2 types of light (second param), 0 = spot light, 1 = point light. I'll just explain point light here.

    shaderLamp(0, 1, {1000,500,1000}, {0,0,0},{1,0,0}, {0,0,0}, {1,0,1}, 1, 90, 1)

    1 - index of the light, if you set shaderActivateLighting(3) you have 3 source, and the last id is 2.
    2 - type, 1 = point light
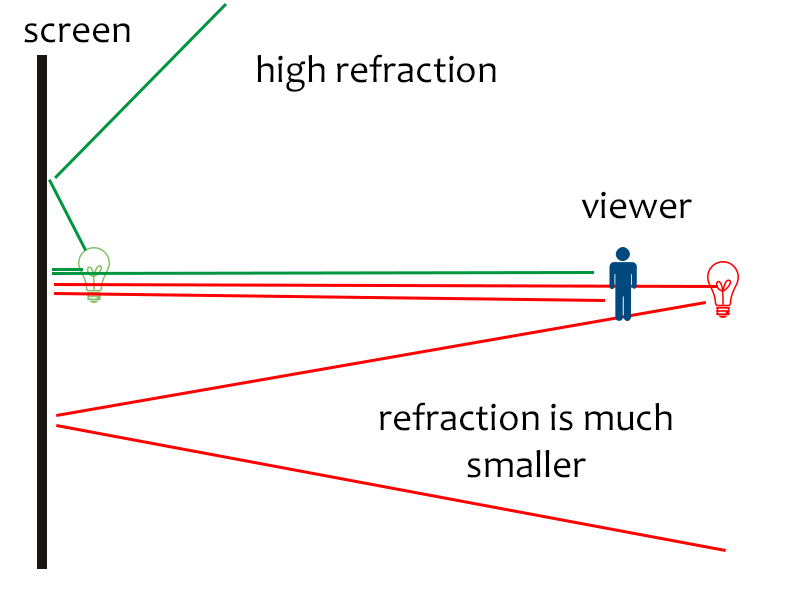
    3 - position in 3d space, x and y are equivalent to screen space, z means how close the light is to the screen, if you move it far away it light the screen very even, but you need to remove the falloff, as you won't see anything or it blow out. If you move it very close, it will light only a small portion, why ? Think of reflectivity, if the light is faaar away it reflects directly into your eye because it's a straight way. If it's really close it doesn't reflect, I'll put an image to that down there.
    4 - target position, point lights don't have targets, so {0,0,0}
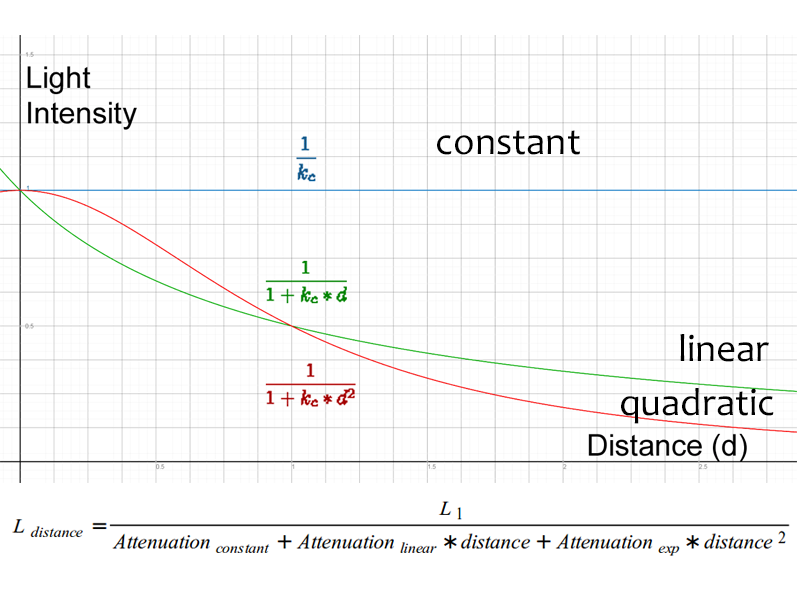
    5 - falloff, very tricky parameter, first component is constant attenuation, means it doesn't fall off over distance, so it's more like exposure but inverted (to get it brighter make it smaller, like 0.01). Second component, linear attenuation, means this is how much the distance makes the light darker, or linear falloff. Third component, quadratic falloff, like linear but it's quadratic so it drops off very fast.
    6 - ambient color, fun part starts, {r, g, b} simple as that. I have added a hsv function if you hate rgb. So it's fromHSV(0, 1, 1) that's red. HSV means hue, saturation and value/volume/lightness. All components from 0-1. Ambient color is much stronger than the diffuse color, use with care.
    7 - diffuse color, again a color, but this is multiplied with your scene color, so it tints the screen.
    8 - diffuse factor, how strong is the diffuse color, you can make it brighter by setting values higher than 1 or darker with lower 1
    9 - only for spotlights (you can leave them out)
    10 - only for spotlights

    More info:
    https://developer.valvesoftware.com/wiki/Constant-Linear-Qua...

    So shaderLamp(0, 1, {1000,500,1000}, {0,0,0},{1,0,0}, {0,0,0}, {1,0,1}, 1) would light the screen pretty evenly. If you move the Lamp closer you get a vignette effect. But you will need to change the falloff settings due the light getting darker.

    If wanted I can also write some about spotlights.

    Thread Captain

    1580 Posts

  • #12, by PykeWednesday, 01. October 2014, 14:05 10 years ago
    Wow Simon! Thanks for this! Im going to have a look at it all tonight and see if I can wrap my head around it.

    Newbie

    59 Posts

  • #13, by PykeWednesday, 01. October 2014, 14:07 10 years ago
    And yes - please could you give a write up on the spotlights. Im assuming many of the parameters are the same, but with an added target?

    Newbie

    59 Posts

  • #14, by SimonSWednesday, 01. October 2014, 16:24 10 years ago
    For spot lights there are some more things. I think I just take the changed parameters first.
    2 - type, for spot light = 0
    4 - target position, notice the position is not that important, it's used to determine the direction of the light, so could be just 1 pixel away and it would be the same result as 100 pixels away. For spot lights it's even more important to think about the depth position of the light. If the target z is higher than the souce z, it's facing the camera but you won't see anything. You need face the light to the screen, so target z smaller than source z. You can model point light like handling by having the same x,y positions for target and source. But to see anything exponent and cutoff need to be 0. The higher the z of the source is, the more will the source of the light be round and not edgy.
    9 - exponent, 0 will have a full spread of 180 degree, the higher the value is the thinner is light, but it's not equivalent to degrees. An exponent of 90 will give you around 20 degree.
    10 - cutoff, is a little like exponent, cuts the light at a percentage, will create a very hard edge. The value ranges from 0-1.

    Thread Captain

    1580 Posts

  • #15, by PykeWednesday, 01. October 2014, 16:57 10 years ago
    I copied the light code

    
    shaderActivateLighting(1)
    
    shaderLamp(0, 1, {1000,500,1000}, {0,0,0},{1,0,0}, {0,0,0}, {1,0,1}, 1)


    and it works (gives the screen an ambient purple tint.

    But when I activate my flashlight:

    
    shaderActivateLighting(3)
    
    bind(shader_effects["light1"].num, "lights[2].position", point(inverty(scrollfix(offset(field("game.CurrentCharacter.Position"),{0,-80}))), 1))
    bind(shader_effects["light1"].num, "lights[3].position", point(inverty(scrollfix(offset(field("game.CurrentCharacter.Position"),{1000,1000}))), 
    factor(dist(offset(field("game.CurrentCharacter.Position"),{0,2}), cursor), -500)))
    
    shaderLamp(2, 1, {100,500,1}, {20,900,10},{0.03,-0.00000001,0.0}, {0,0,0}, {1,1,1}, 1, 90, 1)
    shaderLamp(3, 1, {1000,500,1}, {0,0,1}, {5.01,0.0,0.000002}, {2,2,2}, {2,2,2}, 5, 90, 1)


    it turns off the ambient light.
    Im assuming it has something to do with the light index - but I dont know how to set it as unique?

    shaderActivateLighting(3) - the number is how many lights are in the script, right? Does this number matter with the light index?

    Essentially I'm looking for clarification on this piece:

    1 - index of the light, if you set shaderActivateLighting(3) you have 3 source, and the last id is 2.

    Sorry for being so dense - I'm sure there is something really simple I'm just not understanding!

    Newbie

    59 Posts

  • #16, by SimonSWednesday, 01. October 2014, 17:04 10 years ago
    The point is that the first index starts at 0. So if you have 3 lights, they have the ids 0, 1, 2. Both codes after each other works for me. Reason for that 0 basing is to not confuse the ids with the bindings, because they are 0 based.

    Thread Captain

    1580 Posts

  • #17, by PykeWednesday, 01. October 2014, 20:25 10 years ago
    Got it working. I had an overlap of light index's, so it was turning them off and the other one on. Thanks for being patient - this is all new to me!

    Newbie

    59 Posts

  • #18, by SimonSWednesday, 01. October 2014, 20:39 10 years ago
    No problem, man. I'm really excited what you gonna in the end wink I think I put these descriptions in the wiki.

    Thread Captain

    1580 Posts

  • #19, by PykeWednesday, 01. October 2014, 20:47 10 years ago
    With the current torch script, is there any way that I can make the source of the beam much softer? I need to disguise that its coming from a single point.

    
    shaderActivate(light1)
    
    bind(shader_effects["light1"].num, "lights[0].position", point(inverty(scrollfix(offset(field("game.CurrentCharacter.Position"),{0,-80}))), 1))
    bind(shader_effects["light1"].num, "lights[0].targetpos", point(inverty(cursor), 50))
    bind(shader_effects["light1"].num, "lights[1].position", point(inverty(scrollfix(offset(field("game.CurrentCharacter.Position"),{100,100}))), 
    factor(dist(offset(field("game.CurrentCharacter.Position"),{0,500}), cursor), 200)))
    
    shaderLamp(0, 0, {900,500,1}, {0,900,10}, {0.001,0.000001,0}, {0,0,0}, {1,1,1}, 1, 30, 0)
    shaderLamp(1, 1, {1000,50,1}, {0,0,1}, {0.01,0.0,0.000001}, {2,2,2}, {2,2,2}, 1)


    Newbie

    59 Posts

  • #20, by PykeWednesday, 01. October 2014, 20:50 10 years ago
    Oh I can tell you it makes the game look INCREDIBLE. It looks 3D...the images really jump out at you. Its awesome man...just awesome!

    Newbie

    59 Posts